
Today we have one more our discussions about authentication and authorization standards. This time we will talk about OpenID Connect (OIDC).
Here is the outline of the topics we will cover:
- Introduction
- What is OpenID Connect?
- OpenID application roles
- OpenID Application Roles vs. OAuth Application Roles
- The Authorization Code
- OpenID Scopes: Controlling What Apps Can See
- The ID Token: Your Digital ID Card
- OpenID Endpoints
- Client Registration
- OpenID Flows
- Authorization Code Flow
- Implicit Flow
- Hybrid Flow
Introduction
Before we jump into the details, let’s set the stage. OpenID Connect is an identity layer built on top of the OAuth 2.0 framework. At its core, OpenID Connect helps you verify a user’s identity and get basic profile information without having to store usernames and passwords. This is why you see “Sign in with Google” or “Sign in with Facebook” buttons on websites. They’re using some version of OAuth plus OpenID Connect to make the login process easier, more secure, and more convenient for you.
Picture this: you land on a new website or app, and instead of creating yet another account, you see an option to sign in with a trusted provider—Google, Apple, Microsoft, or some other well-known identity provider (IdP). With a few clicks, you’re in! You didn’t type in a password. You didn’t have to pass your personal data directly to that website. All of that “identity checking” happened behind the scenes, courtesy of OpenID Connect. The site just needs to trust that if Google says “this is you,” then it’s you indeed.
So, let’s start by understanding the basics of OpenID Connect.
What is OpenID Connect?
First off, let’s distinguish OpenID from OpenID Connect. Historically, OpenID (without the “Connect”) was a decentralized authentication protocol that let you use one set of login credentials across multiple websites. Imagine having a single identity URL that you could use wherever you wanted to log in. That was the idea behind the original OpenID. It was quite innovative at the time, but it had some adoption issues and complexities.
Then came OpenID Connect, which built on top of OAuth 2.0 to simplify and modernize the approach. You might still hear “OpenID” used somewhat interchangeably, but in modern usage, we’re almost always referring to OpenID Connect (OIDC), which is the updated protocol that solves real-world authentication challenges very elegantly.
So in simpler terms:
- OpenID (older protocol): Allowed users to use a single identity (a URL) to sign into multiple websites.
- OpenID Connect (modern protocol): An identity layer on top of OAuth 2.0 that relies on tokens (especially the ID token) to authenticate users in a secure and developer-friendly way.
We’ll be focusing on OpenID Connect, but it’s good to know that there’s some historical context behind the name. If you see “OIDC,” that’s your signal that we’re talking about the modern standard for authentication.
OpenID application roles
Now that we know we’re dealing with OpenID Connect, let’s look at who’s who in this protocol. In OIDC, there are a few main players (or roles):
OpenID Provider (OP)
This is the service that authenticates the user and issues tokens—like Google, Microsoft, or any other identity provider. Essentially, the OP is the place that holds the user accounts, checks their credentials, and vouches for their identity.
Relying Party (RP)
Also known as the client application. This is the website or application that needs to verify a user’s identity. It “relies” on the OpenID Provider to do the heavy lifting of authentication.
User (Resource Owner)
That’s you or me. We want to log in to the Relying Party using our account at the OpenID Provider. We give our consent to share some info with the Relying Party (like our email address or basic profile data).
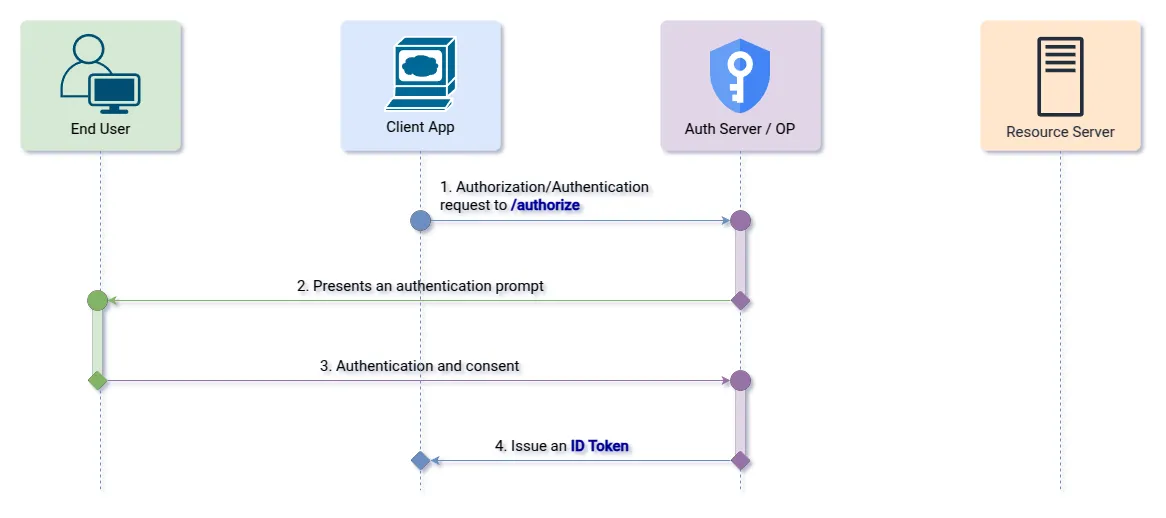
When you click “Sign in with X,” the Relying Party (RP) sends you over to the OpenID Provider (OP). The OP will ask you to sign in (if you’re not already signed in) and then ask for your permission to share your identity details with the RP. If you consent, the OP redirects you back to the RP with the tokens that prove who you are. The RP then uses those tokens to let you in.
OpenID Application Roles vs. OAuth Application Roles
Because OpenID Connect is built on top of OAuth 2.0, it’s helpful to note the slight differences in roles. In OAuth 2.0, we commonly talk about:
- Resource Owner: The user who owns the data or resource.
- Resource Server: The server holding the protected resources (like your photo albums, contact info, etc.).
- Authorization Server: The server that issues tokens and authenticates the Resource Owner.
- Client: The application that wants to access the resources on behalf of the user.
In OpenID Connect terms, the OpenID Provider (OP) corresponds roughly to the Authorization Server in OAuth 2.0. The Relying Party (RP) is the OAuth Client.
The difference in OpenID Connect is that we’re explicitly focusing on identity. Instead of just asking for permission to act on your behalf to access some resource (like your photos), the Relying Party wants to confirm who you are. That’s where the ID Token (which we’ll talk about later) plays a major role. The ID Token is a unique addition from OpenID Connect that’s not just about authorization, but about authentication — verifying your identity.
The Authorization Code
The concept of an Authorization Code is crucial in both OAuth 2.0 and OpenID Connect. Think of the Authorization Code as a little “ticket” you get when you pass the identity check from the OpenID Provider. Once you have this ticket, you can exchange it behind the scenes for tokens from the token endpoint (including the ID token in the case of OIDC).
The Authorization Code approach is considered quite secure because the exchange of the code for tokens happens server-to-server in the background. That means your tokens are not exposed in the browser, reducing the risk that someone might steal them.
OpenID Scopes: Controlling What Apps Can See
When we talk about OAuth 2.0 and OpenID Connect, you’ll often hear the term “scope.” A scope is basically a request for a specific level of access or permission. In OAuth, you might request the ability to read someone’s basic profile info, or to post on their timeline, or to see their email address. These are separate “scopes” you ask for. If the user agrees, you get them. If not, you don’t.
In OpenID Connect, there are special scopes that revolve around identity. The standard OIDC scopes are:
- openid: This is mandatory if you want to use OpenID Connect. It tells the OP that you want to perform an OpenID Connect request, which means you’re asking for an ID Token.
- profile: Asks for basic profile information like name, nickname, and profile picture.
- email: Requests the user’s email address and email verification status.
- address: Requests the user’s postal address.
- phone: Requests the user’s phone number.
For example, if you only need to verify who the user is and get their email, you might request openid email.
The OP will return an ID Token that includes the user’s identity plus their email address, provided the user agrees to share it.
If you need more user info, you can add more scopes like profile or address.
These scopes let you tailor how much information you request to what your application actually needs, following the principle of least privilege—requesting only the necessary data and nothing more.
The ID Token: Your Digital ID Card
At the heart of OpenID Connect is the ID Token. This is the token that proves the user’s identity. It’s a JSON Web Token (JWT), which is a digitally signed (and sometimes encrypted) piece of data. Inside, it contains information about the user and about the token itself.
Because it’s signed by the OpenID Provider, the Relying Party (your application) can verify that the token is authentic and hasn’t been tampered with. This is a big deal because it means that your app can trust the data inside the ID Token. If the ID Token says the user is “[email protected],” it’s a cryptographically verifiable statement coming from the OP.
{
    "iss": "https://openid-provider.com",
    "sub": "1234567890",
    "aud": "client-app-id",
    "exp": 1716307200,
    "iat": 1716303600,
    "nonce": "abc123",
    "email": "[email protected]",
    "name": "John Doe"
}
A question that often comes up is: “What is the difference between an ID Token and an Access Token?”
In OAuth 2.0 alone, you only had the Access Token (and sometimes a Refresh Token). The Access Token is used to call APIs on behalf of the user. In OpenID Connect, ID Token is strictly for identifying the user and transmit private information about them in a secure manner — it’s not meant to call APIs (that’s the job of the Access Token).
OpenID Endpoints
To accomplish all these tasks—authenticating users, issuing tokens, and providing user data—OpenID Connect relies on a few specific endpoints.
This is the endpoint your Relying Party (RP) directs the user to when they start the login process. You can think of it as the front door for authentication. Here, the user will see a login screen (if they’re not already logged in) and possibly a consent screen asking them to grant the Relying Party access to some of their profile information.
A typical request to the Authorization Endpoint includes parameters like:
| Query Param | What It Does |
|---|---|
| response_type | Defines what the app expects (id_token, token, or code). |
| client_id | Identifies the app requesting authentication. |
| redirect_uri | Tells the provider where to send the user after login. |
| scope | Specifies what data the app wants access to. |
| state | A security feature to prevent CSRF attacks. |
| nonce | Prevents replay attacks by adding a unique identifier. |
After the user logs in and consents, the Authorization Endpoint sends them back to the Redirect Endpoint with either a code, token, or ID Token (depending on the flow) in the URL.
2. Redirect Endpoint
Also called the Callback or Redirection endpoint, this is a URL in your Relying Party (application) that receives the response from the OpenID Provider. The user’s browser is redirected here after successful (or unsuccessful) authentication.
- In the Authorization Code Flow, the OP sends you back here with an Authorization Code.
- In the Implicit Flow, it might send you tokens (ID Token and Access Token) directly in the URL.
- In the Hybrid Flow, you might get a combination of code and ID Token (and possibly Access Token).
Once the Relying Party receives the data, it can proceed to exchange the code for tokens (if applicable) and then log the user into the application.
Here are some common query parameters you might see in the Redirect URL:
| Query Param | What It Does |
|---|---|
| code | The authorization code received from the provider. |
| state | Must match the original request to prevent tampering. |
| nonce | Ensures the response hasn’t been reused fraudulently. |
| id_token | The ID token received from the provider. |
| access_token | The access token received from the provider. |
| token_type | The type of token received (Bearer, JWT, etc.). |
3. Token Endpoint
This is the backend endpoint used by the Relying Party’s server to exchange the Authorization Code for tokens. In the Authorization Code Flow, you send a POST request to the Token Endpoint with:
| Query Param | What It Does |
|---|---|
| grant_type | Specifies the flow type (authorization_code, client_credentials etc.). |
| code | The authorization code received earlier. |
| redirect_uri | Must match the one used in the Authorization request. |
| client_id | Identifies the client application. |
This server-to-server exchange is more secure, as tokens aren’t exposed in the browser’s URL or client-side scripts. Only after your server has verified the ID Token do you consider the user “logged in.”
Client Registration
For all of this to work securely, your Relying Party (application) needs to be known to the OpenID Provider. That’s where client registration comes in. If you’ve ever set up “Login with Google” or “Login with Facebook,” you might recall having to create a new “app” or “project” in their developer console. During this process, you get a client_id and a client_secret.
- client_id: A unique public identifier for your application.
- client_secret: A private key known only to your application and the OP (like a password).
You also configure things like:
- The allowed redirect_uris for your application (so the OP knows where to redirect the user).
- The type of application (web app, native app, single-page application, etc.).
- Potentially the scopes you want to request by default.
Once registration is done, your app is recognized by the OP, and the OP can ensure tokens are only issued to legitimate, registered apps. If an unregistered or malicious app tries to get tokens, it won’t match the known client credentials or redirect URLs, and the OP will reject it.
OpenID Flows
Now, let’s talk about flows—OpenID Connect Flows describe how the tokens (ID Token, Access Token, etc.) are retrieved and in which context (server-side, client-side, etc.). You can think of flows as different routes you can take to accomplish the same end goal: authenticate the user.
Each flow is designed for a specific type of application or scenario. Some flows are more secure but require a server back-end (like the Authorization Code Flow). Others are more suited for client-side or mobile apps (like the Implicit Flow). Yet others offer a mix of behaviors (the Hybrid Flow).
Why do we have multiple flows? Because not all applications are the same. Some are purely server-based (traditional web apps), some are single-page apps (SPAs) running entirely in JavaScript, others are native mobile apps, and so on. Each environment has different security considerations.
Authorization Code Flow
The Authorization Code Flow is by far the most common (and recommended) flow for server-side web applications. It’s considered the most secure option because the tokens are acquired directly by the server, away from prying eyes in the browser.
The reason this is secure is the critical steps happen on the server (the code exchange). The user’s browser only sees the Authorization Code, which by itself is useless without the client’s secret. If someone tries to intercept the code, they still need the client secret to successfully trade it for tokens. This is the recommended flow for most web applications.
The Authorization Code Flow can be used in two different ways:
1. Response Type: “code”
In this variant, the authorization server issues only the access token. Its behavior is exactly the same as the OAuth authorization flow.
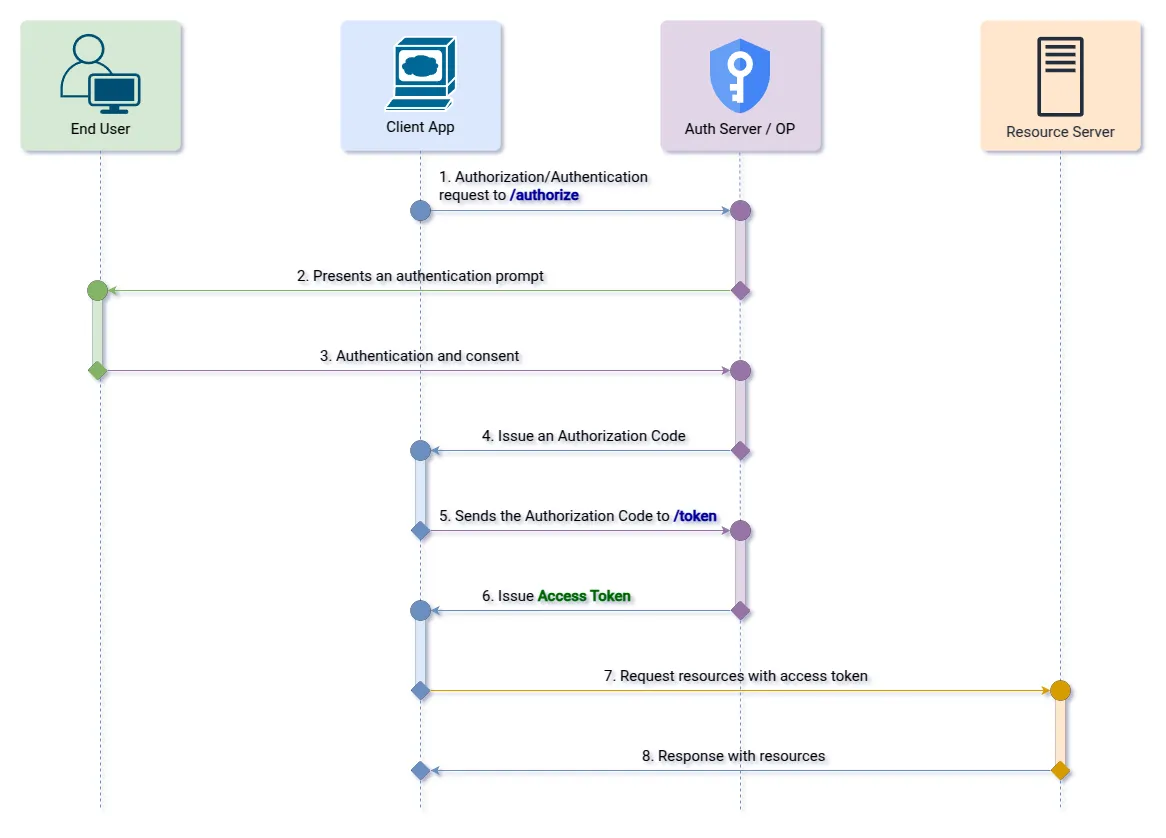
Step 1 (Authorization Endpoint): The client initiates the authorization flow by redirecting the user to the OpenID Provider.
  GET /authorize?
    response_type=code
    &client_id=s6BhdRkqt3
    &redirect_uri=https://client.app.com/callback
    &nonce=n-0S6_WzA2Mj
    &state=af0ifjsldkj HTTP/1.1
Step 2 (Redirect Endpoint): After the user logs in, the provider sends an authorization code back to the client app.
HTTP/1.1 302 Found
  Location: https://client.app.com/callback?
    code=Qcb0Orv1zh30vL1MPRsbm-diHiMwcLyZvn1arpZv-Jxf_11jnpEX3Tgfvk
    &state=af0ifjsldkj
Step 3 (Token Endpoint): The app exchanges the code for an access token.
 POST /token HTTP/1.1
  Host: https://client.app.com
  Content-Type: application/x-www-form-urlencoded
  Authorization: Basic czZCaGRSa3F0MzpnWDFmQmF0M2JW

	grant_type=authorization_code
	&code=SplxlOBeZQQYbYS6WxSbIA
&redirect_uri=https://client.app.com/callback HTTP/1.1 200 OK
Content-Type: application/json
Cache-Control: no-store
{
"access_token": "SlAV32hkKG",
"token_type": "Bearer",
"refresh_token": "8xLOxBtZp8",
"expires_in": 3600
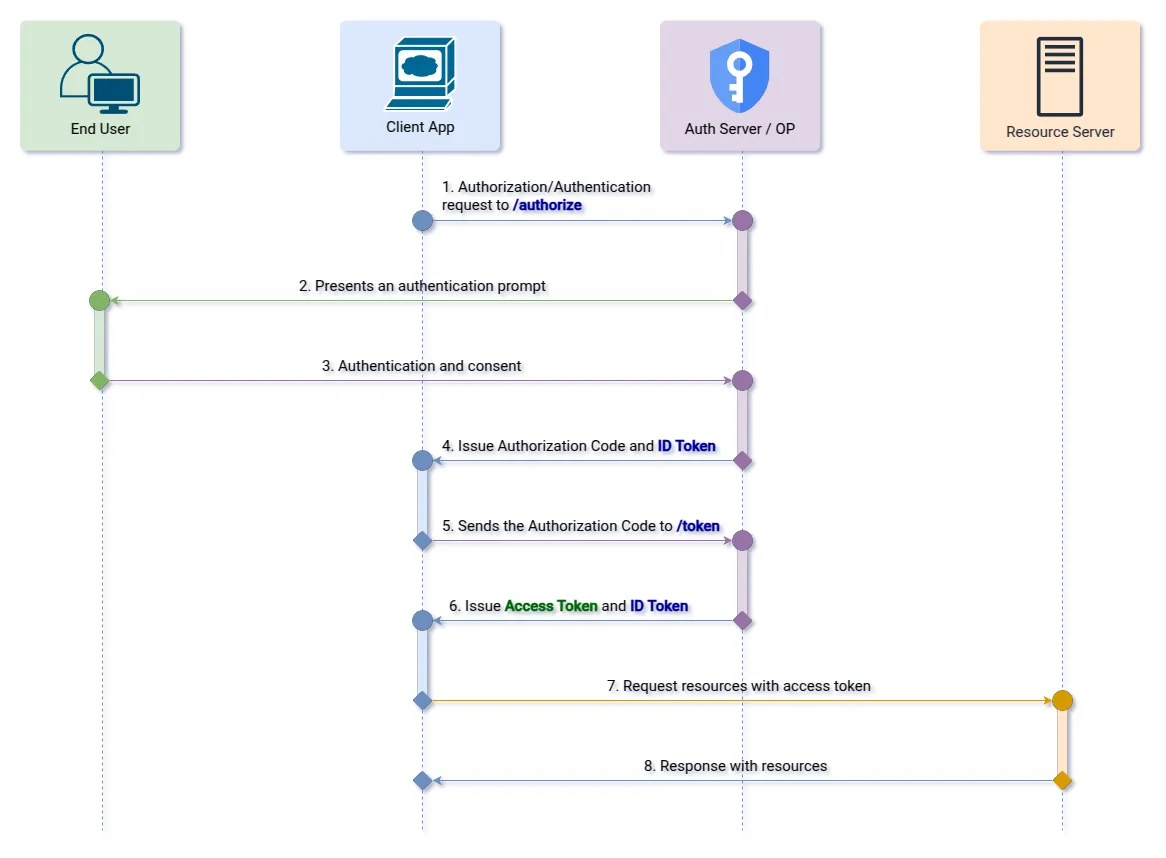
}2. Response Type: “code” + openid scope
If in addition to response_type=code the client requests the “openid” scope, when the generated authorization code is used in the call to the Token Endpoint, the authorization server will return both the access token and the ID token.
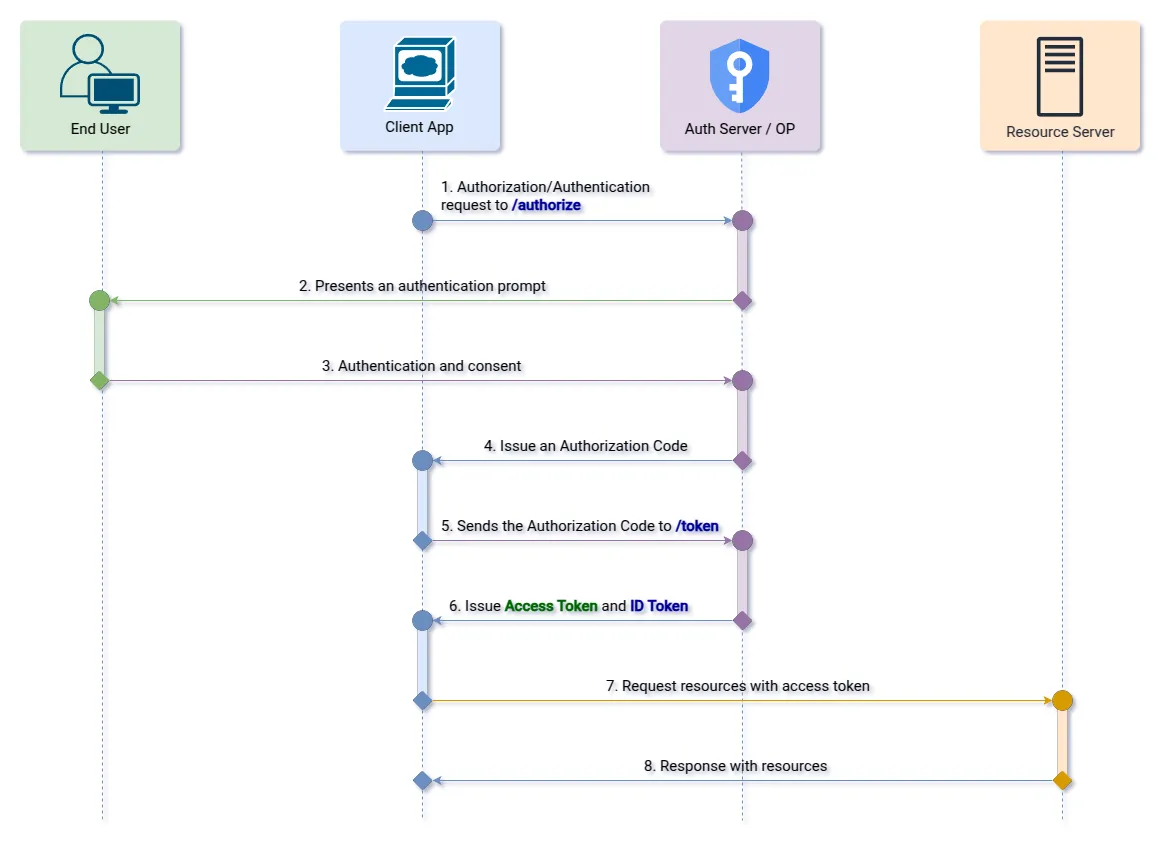
Step 1 (Authorization Endpoint): The client initiates the authorization flow by redirecting the user to the OpenID Provider.
  GET /authorize?
    response_type=code
    &scope=openid profile email
    &client_id=s6BhdRkqt3
    &redirect_uri=https://client.app.com/callback
    &nonce=n-0S6_WzA2Mj
    &state=af0ifjsldkj HTTP/1.1
Step 2 (Redirect Endpoint): After the user logs in, the provider sends an authorization code back to the client app.
HTTP/1.1 302 Found
  Location: https://client.app.com/callback?
    code=Qcb0Orv1zh30vL1MPRsbm-diHiMwcLyZvn1arpZv-Jxf_11jnpEX3Tgfvk
    &state=af0ifjsldkj
Step 3 (Token Endpoint): The app exchanges the code for an ID token and an access token.
 POST /token HTTP/1.1
  Host: https://client.app.com
  Content-Type: application/x-www-form-urlencoded
  Authorization: Basic czZCaGRSa3F0MzpnWDFmQmF0M2JW

	grant_type=authorization_code
	&code=SplxlOBeZQQYbYS6WxSbIA
&redirect_uri=https://client.app.com/callback HTTP/1.1 200 OK
Content-Type: application/json
Cache-Control: no-store
{
"access_token": "SlAV32hkKG",
"token_type": "Bearer",
"refresh_token": "8xLOxBtZp8",
"expires_in": 3600,
"id_token": "eyJhbGciOiJSUzI1NiIsImtpZCI6IjFlOWdkazcifQ.ewogImlzc
yI6ICJodHRwOi8vc2VydmVyLmV4YW1wbGUuY29tIiwKICJzdWIiOiAiMjQ4Mjg5
NzYxMDAxIiwKICJhdWQiOiAiczZCaGRSa3F0MyIsCiAibm9uY2UiOiAibi0wUzZ
fV3pBMk1qIiwKICJleHAiOiAxMzExMjgxOTcwLAogImlhdCI6IDEzMTEyODA5Nz
AKfQ.ggW8hZ1EuVLuxNuuIJKX_V8a_OMXzR0EHR9R6jgdqrOOF4daGU96Sr_P6q
Jp6IcmD3HP99Obi1PRs-cwh3LO-p146waJ8IhehcwL7F09JdijmBqkvPeB2T9CJ
NqeGpe-gccMg4vfKjkM8FcGvnzZUN4_KSP0aAp1tOJ1zZwgjxqGByKHiOtX7Tpd
QyHE5lcMiKPXfEIQILVq0pc_E2DzL7emopWoaoZTF_m0_N0YzFC6g6EJbOEoRoS
K5hoDalrcvRYLSrQAZZKflyuVCyixEoV9GfNQC3_osjzw2PAithfubEEBLuVVk4
XUVrWOLrLl0nx7RkKU8NXNHq-rvKMzqg"
}Implicit Flow
The Implicit Flow was created for scenarios where a client secret can’t be securely stored—like a JavaScript single-page application (SPA) running in a user’s browser. In these cases, the entire application code is visible to the user (and potentially attackers), so storing a secret is a no-go.
The main drawback is that the tokens are exposed in the browser’s URL fragment, which might be captured in logs or by malicious scripts. Therefore, Implicit Flow is less recommended nowadays, especially if you can use the Authorization Code Flow with PKCE (Proof Key for Code Exchange). PKCE is an extension that makes the Authorization Code Flow more secure for public clients.
What changes in each of its variants is which tokens are returned in the authorization response. In this flow, the Token Endpoint is unused.
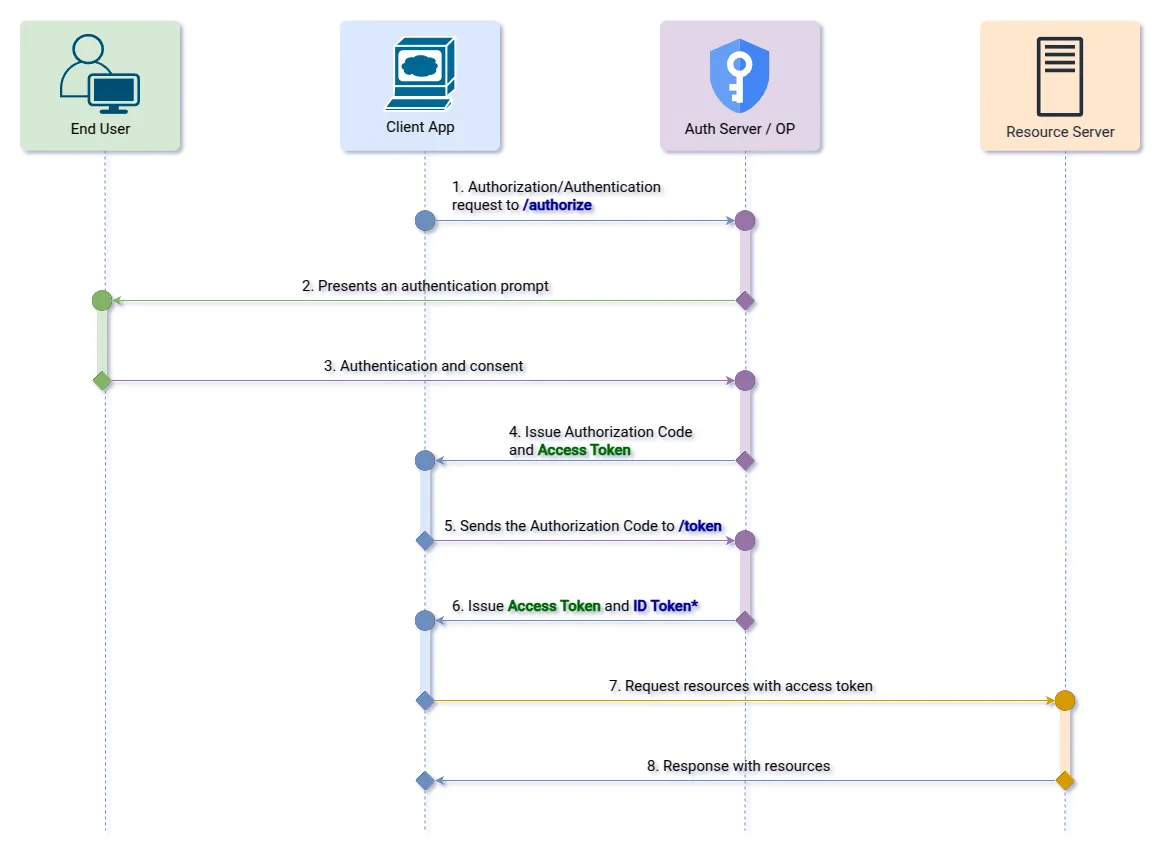
1. Response Type: “token”
Allows the access token to be sent directly to the client application’s redirect URL at the end of user consent.
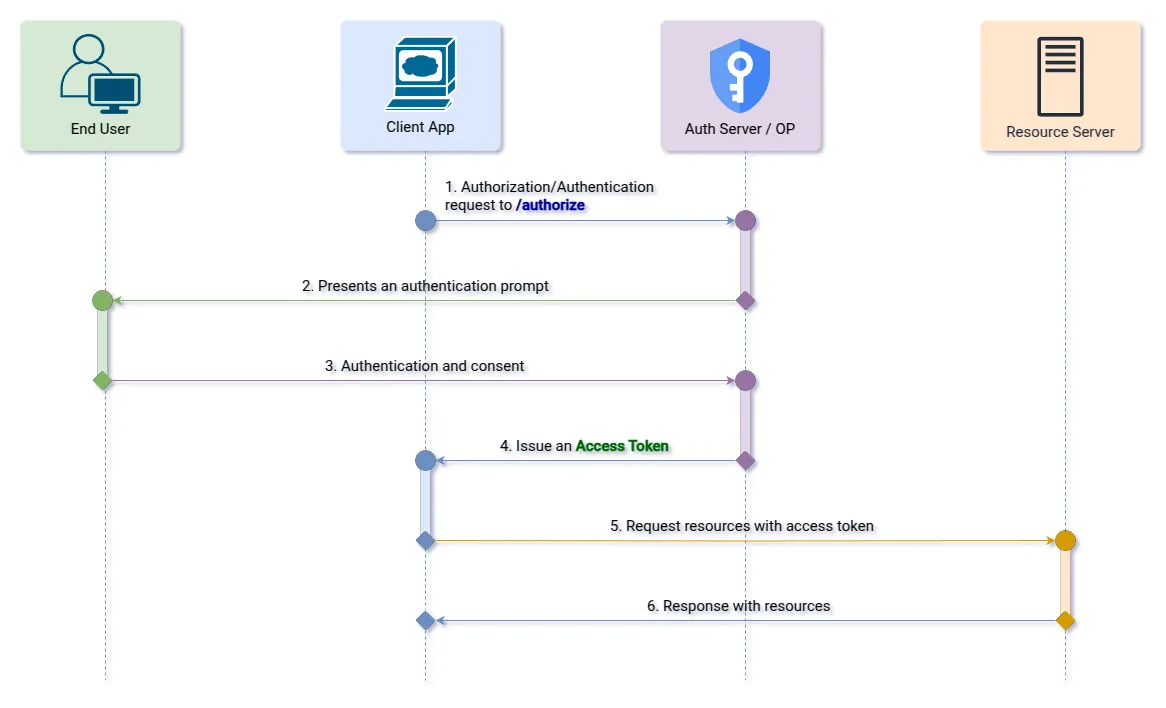
Step 1 (Authorization Endpoint): The client initiates the authorization flow by redirecting the user to the OpenID Provider.
  GET /authorize?
    response_type=token
    &client_id=s6BhdRkqt3
    &redirect_uri=https://client.app.com/callback
    &nonce=n-0S6_WzA2Mj
    &state=af0ifjsldkj HTTP/1.1
Step 2 (Redirect Endpoint): After the user logs in, the provider sends an access token back to the client app.
  HTTP/1.1 302 Found
  Location: https://client.app.com/callback#
    access_token=jHkWEdUXMU1BwAsC4vtUsZwnNvTIxEl0z9K3vx5KF0Y
    &token_type=Bearer
2. Response Type: “id_token”
Allows the ID token to be sent directly to the client application’s redirect URL at the end of user consent.
Step 1 (Authorization Endpoint): The client initiates the authorization flow by redirecting the user to the OpenID Provider.
  GET /authorize?
    response_type=id_token
    &scope=openid profile email
    &client_id=s6BhdRkqt3
    &redirect_uri=https://client.app.com/callback
    &nonce=n-0S6_WzA2Mj
    &state=af0ifjsldkj HTTP/1.1
Step 2 (Redirect Endpoint): After the user logs in, the provider sends an ID token back to the client app.
  HTTP/1.1 302 Found
  Location: https://client.app.com/callback#
    id_token=eyJraWQiOiIxZTlnZGs3IiwiYWxnIjoiUlMyNTYifQ.
    ewogImlzcyI6ICJodHRwczovL3NlcnZlci5leGFtcGxlLmNvbSIsCiAic3ViIjog
    IjI0ODI4OTc2MTAwMSIsCiAiYXVkIjogInM2QmhkUmtxdDMiLAogIm5vbmNlIjog
    Im4tMFM2X1d6QTJNaiIsCiAiZXhwIjogMTMxMTI4MTk3MCwKICJpYXQiOiAxMzEx
    MjgwOTcwLAogIm5hbWUiOiAiSmFuZSBEb2UiLAogImdpdmVuX25hbWUiOiAiSmFu
    ZSIsCiAiZmFtaWx5X25hbWUiOiAiRG9lIiwKICJnZW5kZXIiOiAiZmVtYWxlIiwK
    ICJiaXJ0aGRhdGUiOiAiMDAwMC0xMC0zMSIsCiAiZW1haWwiOiAiamFuZWRvZUBl
    eGFtcGxlLmNvbSIsCiAicGljdHVyZSI6ICJodHRwOi8vZXhhbXBsZS5jb20vamFu
    ZWRvZS9tZS5qcGciCn0.
    NTibBYW_ZoNHGm4ZrWCqYA9oJaxr1AVrJCze6FEcac4t_EOQiJFbD2nVEPkUXPuM
    shKjjTn7ESLIFUnfHq8UKTGibIC8uqrBgQAcUQFMeWeg-PkLvDTHk43Dn4_aNrxh
    mWwMNQfkjqx3wd2Fvta9j8yG2Qn790Gwb5psGcmBhqMJUUnFrGpyxQDhFIzzodmP
    okM7tnUxBNj-JuES_4CE-BvZICH4jKLp0TMu-WQsVst0ss-vY2RPdU1MzL59mq_e
    Kk8Rv9XhxIr3WteA2ZlrgVyT0cwH3hlCnRUsLfHtIEb8k1Y_WaqKUu3DaKPxqRi6
    u0rN7RO2uZYPzC454xe-mg
    &state=af0ifjsldkj
3. Response Type: “token id_token”
Allows that at the end of the user’s consent, both the access token and ID token are sent directly to the client application’s redirect URL.

Step 1 (Authorization Endpoint): The client initiates the authorization flow by redirecting the user to the OpenID Provider.
  GET /authorize?
    response_type=token id_token
    &scope=openid profile email
    &client_id=s6BhdRkqt3
    &redirect_uri=https://client.app.com/callback
    &nonce=n-0S6_WzA2Mj
    &state=af0ifjsldkj HTTP/1.1
Step 2 (Redirect Endpoint): After the user logs in, the provider sends an access token and an ID token back to the client app.
  HTTP/1.1 302 Found
  Location: https://client.app.com/callback#
    access_token=jHkWEdUXMU1BwAsC4vtUsZwnNvTIxEl0z9K3vx5KF0Y
    &token_type=Bearer
    &id_token=eyJraWQiOiIxZTlnZGs3IiwiYWxnIjoiUlMyNTYifQ.
    ewogImlzcyI6ICJodHRwczovL3NlcnZlci5leGFtcGxlLmNvbSIsCiAic3ViIjog
    IjI0ODI4OTc2MTAwMSIsCiAiYXVkIjogInM2QmhkUmtxdDMiLAogIm5vbmNlIjog
    Im4tMFM2X1d6QTJNaiIsCiAiZXhwIjogMTMxMTI4MTk3MCwKICJpYXQiOiAxMzEx
    MjgwOTcwLAogImF0X2hhc2giOiAiNzdRbVVQdGpQZnpXdEYyQW5wSzlSUSIKfQ.
    kdqTmftlaXg5WBYBr1wkxhkqCGZPc0k8vTiV5g2jj67jQ7XkrDamYx2bOkZLdZrp
    MPIzkdYB1nZI_G8vQGQuamRhJcEIt21kblGPZ-yhEhdkAiZIZLu38rChalDS2Mh0
    glE_rke5XXRhmqqoEFFdziFdnO3p61-7y51co84OEAZvARSINQaOWIzvioRfs4zw
    IFOaT33Vpxfqr8HDyh31zo9eBW2dSQuCa071z0ENWChWoPliK1JCo_Bk9eDg2uwo
    2ZwhsvHzj6TMQ0lYOTzufSlSmXIKfjlOsb3nftQeR697_hA-nMZyAdL8_NRfaC37
    XnAbW8WB9wCfECp7cuNuOg
    &state=af0ifjsldkj
Hybrid Flow
OpenID Hybrid Flow is like the best of both worlds—it combines aspects of both the Authorization Code Flow and the Implicit Flow to give you more flexibility. It allows the Relying Party to receive some tokens immediately from the Authorization Endpoint and still use a back-end server to exchange the code for additional tokens. This flow is useful when you want to quickly display user info in your front-end without waiting for a full backend exchange, but you also want the added security of retrieving more sensitive tokens server-side.
Why might you want this? In some use cases, you need immediate ID Token-based authentication for the front-end but also want the security of a back-end token exchange for certain operations. It’s a flexible approach but is more complex to implement and understand.
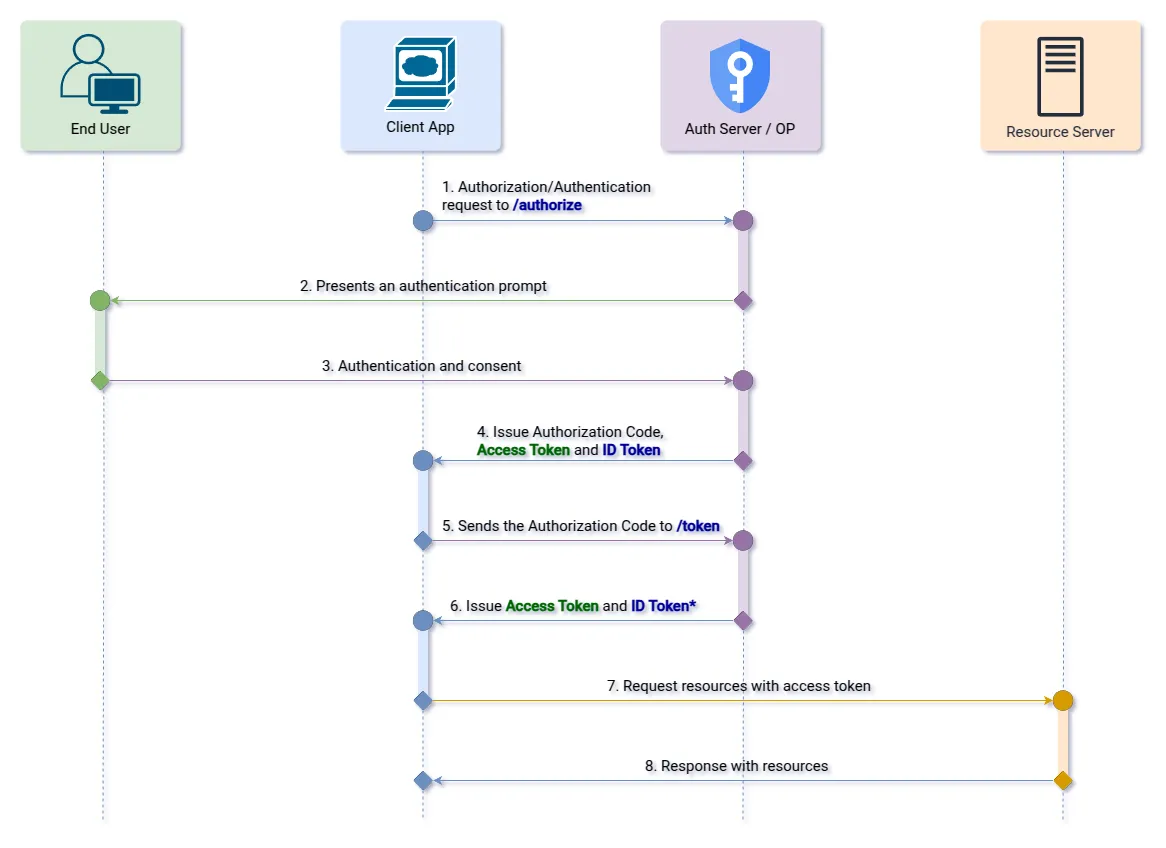
1. Response Type: “code id_token”
Allows the receipt of the ID Token directly in the response of the authorization request along with the Authorization Code. But it also allows both the Access Token and the ID Token to be obtained by sending the Authorization Code to the Token Endpoint.
Step 1 (Authorization Endpoint): The client initiates the authorization flow by redirecting the user to the OpenID Provider.
  GET /authorize?
    response_type=code id_token
    &scope=openid profile email
    &client_id=s6BhdRkqt3
    &redirect_uri=https://client.app.com/callback
    &nonce=n-0S6_WzA2Mj
    &state=af0ifjsldkj HTTP/1.1
Step 2 (Redirect Endpoint): After the user logs in, the provider sends an authorization code and an ID token back to the client app.
HTTP/1.1 302 Found
  Location: https://client.example.org/cb#
    code=Qcb0Orv1zh30vL1MPRsbm-diHiMwcLyZvn1arpZv-Jxf_11jnpEX3Tgfvk
    &id_token=eyJraWQiOiIxZTlnZGs3IiwiYWxnIjoiUlMyNTYifQ.
    ewogImlzcyI6ICJodHRwczovL3NlcnZlci5leGFtcGxlLmNvbSIsCiAic3ViIjog
    IjI0ODI4OTc2MTAwMSIsCiAiYXVkIjogInM2QmhkUmtxdDMiLAogIm5vbmNlIjog
    Im4tMFM2X1d6QTJNaiIsCiAiZXhwIjogMTMxMTI4MTk3MCwKICJpYXQiOiAxMzEx
    MjgwOTcwLAogImNfaGFzaCI6ICJMRGt0S2RvUWFrM1BrMGNuWHhDbHRBIgp9.
    MRPihYtNIcwKTZ_mcMSPfreVytGR4jfl1Tzbv4tH5Jr4WqONs2lUWrIEpZ2joKbZ
    fAGlouAqwqSYpfR3FQYKYvdgnZ3kjIJ_5M4fAARXHVSciGyhfqB-OhDUMXSHzFHi
    GKNY9TKSgRfiXf_314WRujpqaDtj2uoXbppobYXvAZIxWtsOein0-t91LDS39EW4
    frNWAopKTBBi_XJPlpLVynWTDvNleEBP6UxIMgYJBKlqsP7RGfHTGk3ReXDacR7R
    GZlIVGa-0qRyDzvNqD7xfu9aYufUP0oBGqdBGgFVNmwJ7rmB0gdPtC2eJsXq9svC
    gBBfhRQZxhx1iLJjNc9nSw
    &state=af0ifjsldkj
Step 3 (Token Endpoint): The client application can later use the authorization code to obtain an ID token and an access token.
 POST /token HTTP/1.1
  Host: https://client.app.com
  Content-Type: application/x-www-form-urlencoded
  Authorization: Basic czZCaGRSa3F0MzpnWDFmQmF0M2JW

	grant_type=authorization_code
	&code=SplxlOBeZQQYbYS6WxSbIA
&redirect_uri=https://client.app.com/callback HTTP/1.1 200 OK
Content-Type: application/json
Cache-Control: no-store
{
"access_token": "SlAV32hkKG",
"token_type": "Bearer",
"refresh_token": "8xLOxBtZp8",
"expires_in": 3600,
"id_token": "eyJhbGciOiJSUzI1NiIsImtpZCI6IjFlOWdkazcifQ.ewogImlzc
yI6ICJodHRwOi8vc2VydmVyLmV4YW1wbGUuY29tIiwKICJzdWIiOiAiMjQ4Mjg5
NzYxMDAxIiwKICJhdWQiOiAiczZCaGRSa3F0MyIsCiAibm9uY2UiOiAibi0wUzZ
fV3pBMk1qIiwKICJleHAiOiAxMzExMjgxOTcwLAogImlhdCI6IDEzMTEyODA5Nz
AKfQ.ggW8hZ1EuVLuxNuuIJKX_V8a_OMXzR0EHR9R6jgdqrOOF4daGU96Sr_P6q
Jp6IcmD3HP99Obi1PRs-cwh3LO-p146waJ8IhehcwL7F09JdijmBqkvPeB2T9CJ
NqeGpe-gccMg4vfKjkM8FcGvnzZUN4_KSP0aAp1tOJ1zZwgjxqGByKHiOtX7Tpd
QyHE5lcMiKPXfEIQILVq0pc_E2DzL7emopWoaoZTF_m0_N0YzFC6g6EJbOEoRoS
K5hoDalrcvRYLSrQAZZKflyuVCyixEoV9GfNQC3_osjzw2PAithfubEEBLuVVk4
XUVrWOLrLl0nx7RkKU8NXNHq-rvKMzqg"
}2. Response Type: “code token”
Allows the receipt of the Access Token directly in the response to the authorization request along with the Authorization Code. But it also allows both the Access Token and the ID Token to be obtained by sending the Authorization Code to the Token Endpoint.
Step 1 (Authorization Endpoint): The client initiates the authorization flow by redirecting the user to the OpenID Provider.
  GET /authorize?
    response_type=code token
    &scope=openid profile email
    &client_id=s6BhdRkqt3
    &redirect_uri=https://client.app.com/callback
    &nonce=n-0S6_WzA2Mj
    &state=af0ifjsldkj HTTP/1.1
Step 2 (Redirect Endpoint): After the user logs in, the provider sends an authorization code and an access token back to the client app.
HTTP/1.1 302 Found
  Location: https://client.example.org/cb#
    code=Qcb0Orv1zh30vL1MPRsbm-diHiMwcLyZvn1arpZv-Jxf_11jnpEX3Tgfvk
    &access_token=jHkWEdUXMU1BwAsC4vtUsZwnNvTIxEl0z9K3vx5KF0Y
    &token_type=Bearer
Step 3 (Token Endpoint): The client application can later use the authorization code to obtain an ID token and an access token from the authorization server.
 POST /token HTTP/1.1
  Host: https://client.app.com
  Content-Type: application/x-www-form-urlencoded
  Authorization: Basic czZCaGRSa3F0MzpnWDFmQmF0M2JW

	grant_type=authorization_code
	&code=SplxlOBeZQQYbYS6WxSbIA
&redirect_uri=https://client.app.com/callback HTTP/1.1 200 OK
Content-Type: application/json
Cache-Control: no-store
{
"access_token": "SlAV32hkKG",
"token_type": "Bearer",
"refresh_token": "8xLOxBtZp8",
"expires_in": 3600,
"id_token": "eyJhbGciOiJSUzI1NiIsImtpZCI6IjFlOWdkazcifQ.ewogImlzc
yI6ICJodHRwOi8vc2VydmVyLmV4YW1wbGUuY29tIiwKICJzdWIiOiAiMjQ4Mjg5
NzYxMDAxIiwKICJhdWQiOiAiczZCaGRSa3F0MyIsCiAibm9uY2UiOiAibi0wUzZ
fV3pBMk1qIiwKICJleHAiOiAxMzExMjgxOTcwLAogImlhdCI6IDEzMTEyODA5Nz
AKfQ.ggW8hZ1EuVLuxNuuIJKX_V8a_OMXzR0EHR9R6jgdqrOOF4daGU96Sr_P6q
Jp6IcmD3HP99Obi1PRs-cwh3LO-p146waJ8IhehcwL7F09JdijmBqkvPeB2T9CJ
NqeGpe-gccMg4vfKjkM8FcGvnzZUN4_KSP0aAp1tOJ1zZwgjxqGByKHiOtX7Tpd
QyHE5lcMiKPXfEIQILVq0pc_E2DzL7emopWoaoZTF_m0_N0YzFC6g6EJbOEoRoS
K5hoDalrcvRYLSrQAZZKflyuVCyixEoV9GfNQC3_osjzw2PAithfubEEBLuVVk4
XUVrWOLrLl0nx7RkKU8NXNHq-rvKMzqg"
}3. Response Type: “code token id_token”
Allows the receipt of the ID Token and the Access Token directly in the response of the authorization request along with the Authorization Code. But it also allows both to be obtained by sending the Authorization Code to the Token Endpoint.
Step 1 (Authorization Endpoint): The client initiates the authorization flow by redirecting the user to the OpenID Provider.
  GET /authorize?
    response_type=code token id_token
    &scope=openid profile email
    &client_id=s6BhdRkqt3
    &redirect_uri=https://client.app.com/callback
    &nonce=n-0S6_WzA2Mj
    &state=af0ifjsldkj HTTP/1.1
Step 2 (Redirect Endpoint): After the user logs in, the provider sends an authorization code, an ID token and access token back to the client app.
  HTTP/1.1 302 Found
  Location: https://client.example.org/cb#
    code=Qcb0Orv1zh30vL1MPRsbm-diHiMwcLyZvn1arpZv-Jxf_11jnpEX3Tgfvk
    &access_token=jHkWEdUXMU1BwAsC4vtUsZwnNvTIxEl0z9K3vx5KF0Y
    &token_type=Bearer
    &id_token=eyJraWQiOiIxZTlnZGs3IiwiYWxnIjoiUlMyNTYifQ.
    ewogImlzcyI6ICJodHRwczovL3NlcnZlci5leGFtcGxlLmNvbSIsCiAic3ViIjog
    IjI0ODI4OTc2MTAwMSIsCiAiYXVkIjogInM2QmhkUmtxdDMiLAogIm5vbmNlIjog
    Im4tMFM2X1d6QTJNaiIsCiAiZXhwIjogMTMxMTI4MTk3MCwKICJpYXQiOiAxMzEx
    MjgwOTcwLAogImF0X2hhc2giOiAiNzdRbVVQdGpQZnpXdEYyQW5wSzlSUSIsCiAi
    Y19oYXNoIjogIkxEa3RLZG9RYWszUGswY25YeENsdEEiCn0.
    A2OhhJzbUNaCbNLqNaqetGLJoxB3ujVbq_HLYSOWgWCJ3-B__YxlqIg8gpeL0Vhv
    rWX0mwz7w_pGTRN4JdgsI0xAlT5fob1ZPnrazgonSyzaXcg2bgD896SsBSlG_8JX
    6JKaztXifn8k2gy65Me-sMyQrRF8xv_q1CeC871sZpMjJzy5nx65BTI17vcXjntZ
    HADv6o2CrHrEdHp8xSlnTLiiIqgDOmKlpkeqqOBK6dqa4rXZlSqMAUm1LYZmtb2D
    8sHvQsxTbWlBkX7VZaTSqMJ487s4ZIEea8Bw4KGVOntQue4VhBjBnQ4bQKhB_47D
    xlWpSyOWdy3cer_zxKrfvw
    &state=af0ifjsldkj
Step 3 (Token Endpoint): The client application can later use the authorization code to obtain an ID token and an access token.
 POST /token HTTP/1.1
  Host: https://client.app.com
  Content-Type: application/x-www-form-urlencoded
  Authorization: Basic czZCaGRSa3F0MzpnWDFmQmF0M2JW

	grant_type=authorization_code
	&code=SplxlOBeZQQYbYS6WxSbIA
&redirect_uri=https://client.app.com/callback HTTP/1.1 200 OK
Content-Type: application/json
Cache-Control: no-store
{
"access_token": "SlAV32hkKG",
"token_type": "Bearer",
"refresh_token": "8xLOxBtZp8",
"expires_in": 3600,
"id_token": "eyJhbGciOiJSUzI1NiIsImtpZCI6IjFlOWdkazcifQ.ewogImlzc
yI6ICJodHRwOi8vc2VydmVyLmV4YW1wbGUuY29tIiwKICJzdWIiOiAiMjQ4Mjg5
NzYxMDAxIiwKICJhdWQiOiAiczZCaGRSa3F0MyIsCiAibm9uY2UiOiAibi0wUzZ
fV3pBMk1qIiwKICJleHAiOiAxMzExMjgxOTcwLAogImlhdCI6IDEzMTEyODA5Nz
AKfQ.ggW8hZ1EuVLuxNuuIJKX_V8a_OMXzR0EHR9R6jgdqrOOF4daGU96Sr_P6q
Jp6IcmD3HP99Obi1PRs-cwh3LO-p146waJ8IhehcwL7F09JdijmBqkvPeB2T9CJ
NqeGpe-gccMg4vfKjkM8FcGvnzZUN4_KSP0aAp1tOJ1zZwgjxqGByKHiOtX7Tpd
QyHE5lcMiKPXfEIQILVq0pc_E2DzL7emopWoaoZTF_m0_N0YzFC6g6EJbOEoRoS
K5hoDalrcvRYLSrQAZZKflyuVCyixEoV9GfNQC3_osjzw2PAithfubEEBLuVVk4
XUVrWOLrLl0nx7RkKU8NXNHq-rvKMzqg"
}